
Publishing
Last updated on 2026-04-27 | Edit this page
Overview
Questions
- How do I get my Git repository published once it is ready and has been approved?
- What static objects should I create in Git for the final release?
- How do I make the DOI point to the correct Git object?
Objectives
- Update the
DISCLAIMER.mdto the approved language. - Create a ticket to request publication of your software.
- Create a tag and a “release” in your Git repo.
- Publish a DOI.
Publishing Software Overview
Congratulations! You have added all the required files, completed the software reviews, and are ready to publish the software in your Git repository!
As a reminder, at this point you should have an appropriate version of the following files:
- LICENSE.md
- DISCLAIMER.md
- README.md
- code.json
- optional: CITATION.md
And completed the following tasks:
- Created a DOI
- Completed the review process
- Obtained IPDS approval
- Started a release candidate branch
Update Disclaimer for Release Candidate Branch
Once you have merged your final approved content into the release
candidate branch, you should update the DISCLAIMER.md from
provisional to approved in the release candidate branch
only. In the main branch, this file must continue
to reflect the provisional wording. Language for approved software can
be found in section 5 of the FSP
Guidance on Disclaimer Statements Allowed in USGS Science Information
Products
Please note that the release candidate branch should
not be merged back in the main branch at
any point. During the review process and up until publication, changes
can be promoted from the main branch into the release
candidate branch.
The following diagram was created with Learn Git Branching using the following commands to demonstrate the process of updating disclaimer statements and rebasing the release candidate branch:
BASH
# Switch to release candidate branch 1.0.0
git switch -c 1.0.0

# Update the release candidate branch's disclaimer statement to approved
git commit -m "Update disclaimer statement to approved in release candidate branch"

# Return to the main branch and make a change that will need to be promoted to the release candidate branch
git switch main
git commit -m "Make a change in the main branch"

# Switch back to the release candidate branch 1.0.0
git switch 1.0.0

# Rebase the release candidate branch from main. This will add the commit from the main branch to 1.0.0 without changing the disclaimer statement in 1.0.0
git rebase main

# Return to the main branch after publishing 1.0.0
git switch main
git commit -m "Continue working on main branch"

# Create a new release candidate branch for 2.0.0
git switch -c 2.0.0

# Update the release candidate branch's disclaimer statement to approved
git commit -m "Update disclaimer statement to approved in release candidate branch"

# Return to the main branch and make a change that will need to be promoted to the release candidate branch
git switch main
git commit -m "Make a change in the main branch"

# Switch back to the release candidate branch 2.0.0
git switch 2.0.0

# Rebase the release candidate branch from main. This will add the commit from the main branch to 2.0.0 without changing the disclaimer statement in 2.0.0
git rebase main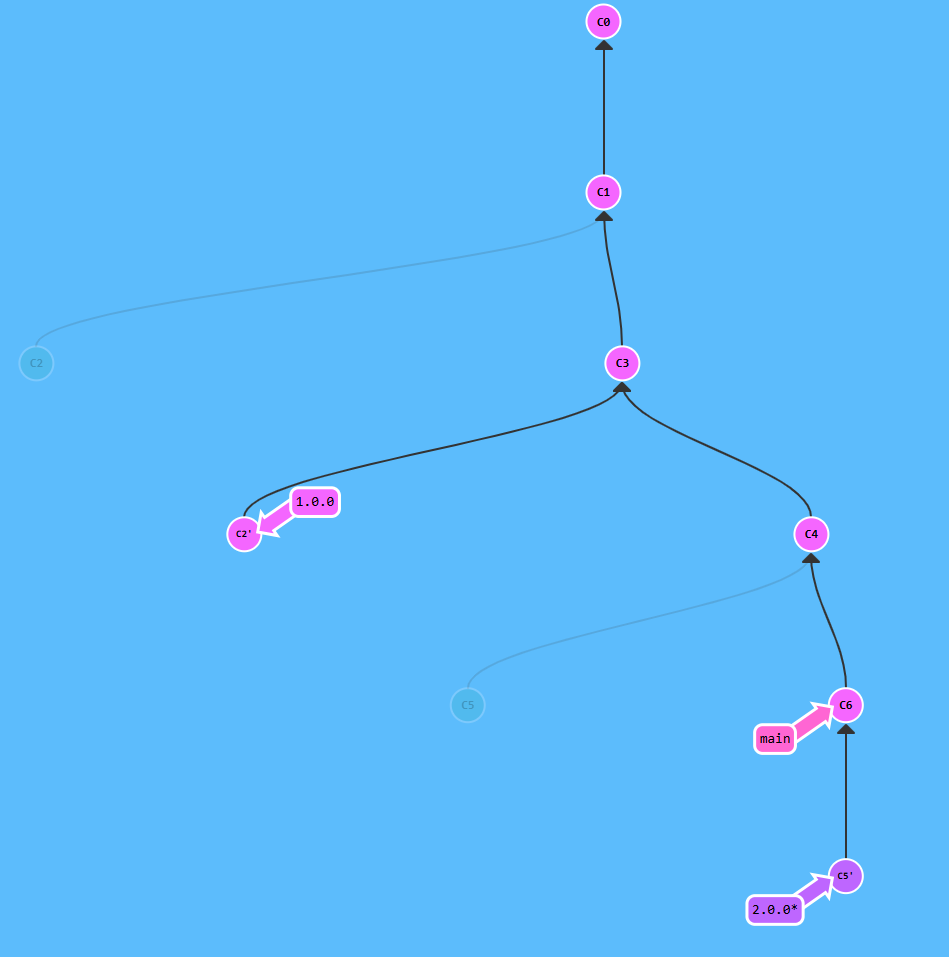
Try it out yourself to see the workflow in action: Learn Git Branching!
Update the DISCLAIMER.md in the release
candidate branch 1.0.0
Update the DISCLAIMER.md file in your 1.0.0 branch to
use the appropriate approved software disclaimer.
- In GitLab, navigate to your
1.0.0branch (e.g.,Code–>Branches–> Select1.0.0). - Open DISCLAIMER.md
- Select
Edit–>Edit single file - Replace the current text with the approved disclaimer text from FSP Guidance on Disclaimer Statements Allowed in USGS Science Information Products.
Commit changes
Initiate a Request to Publish your Code
After double checking the above list and reviewing the software release checklist, navigate to the USGS GitLab Software Management repository issue page. To initiate a request, open an issue on this project and in the fields seen below, add a descriptive title and select the “GitLab Official Release” template under the “Description” field:
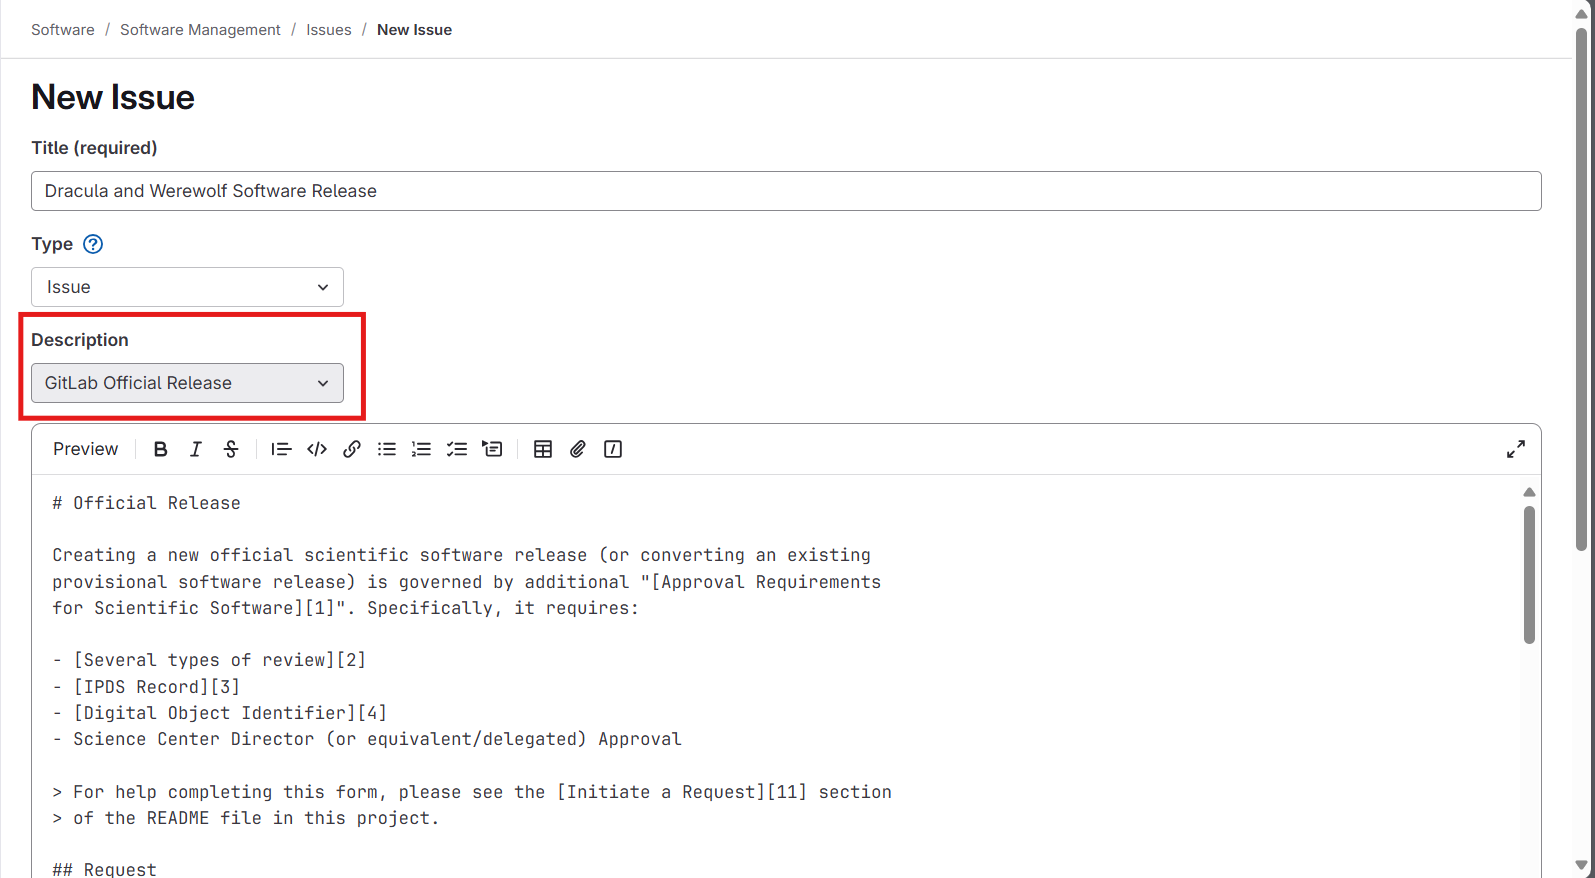
Selecting “GitLab Official Release” will pre-populate the text box with a template that includes sections for you to fill out. If you have followed along so far, you should have all the information requested. Update the template text with information relevant to your request:
For fields requesting textual input, examples are provided between
backticks `e.g. example`; replace the content between the
backticks with your answer.
Fields with a checkbox (a space between two square brackets) are
asking you to acknowledge or agree to associated text; replace the space
between the brackets with an x to indicate you
agree/acknowledge.
Do not edit the /label lines as they may delay
notification/processing of your request.
When done, click “Create Issue” at the bottom.
The template may ask for the username of the approving official. If
they have a GitLab username, you can tag them using the @
symbol: @vdracula. If they do not, you can write their
email address instead: vdracula@usgs.gov.
Once an administrator sees the issue, they run an automated final validation tool to provide feedback on errors. That is why you will see this note at the bottom of their message:
Often, the feedback concerns errors from the code.json
file not containing the correct urls. Reviewing the Creating Metadata lesson may help
clarify how to fix these errors.
As part of this course, you will not be submitting your Vampire and Wolfman project for publication, but you can take a look at current Git projects that have been submitted.
Navigate to the Software Management Issues page using the link provided by your instructor. Do you see any requests for publishing software? Click on a few and see how they filled out the template. What responses did they receive? What did they need to edit before publication? Do the requested edits align with what you’ve learned so far? How would you fix the errors?
Create a Git Tag
Once you have corrected all errors and received approval via the Git Issue, your next step is to create a static Git tag and delete the release candidate branch. Because a branch and tag of the same name have the same URL, we delete the branch after creating the tag to avoid confusion. A tag is a human readable name that points to a specific commit ID and does not change with subsequent updates or commits. Because of this stability, it is used for the official version of the software.
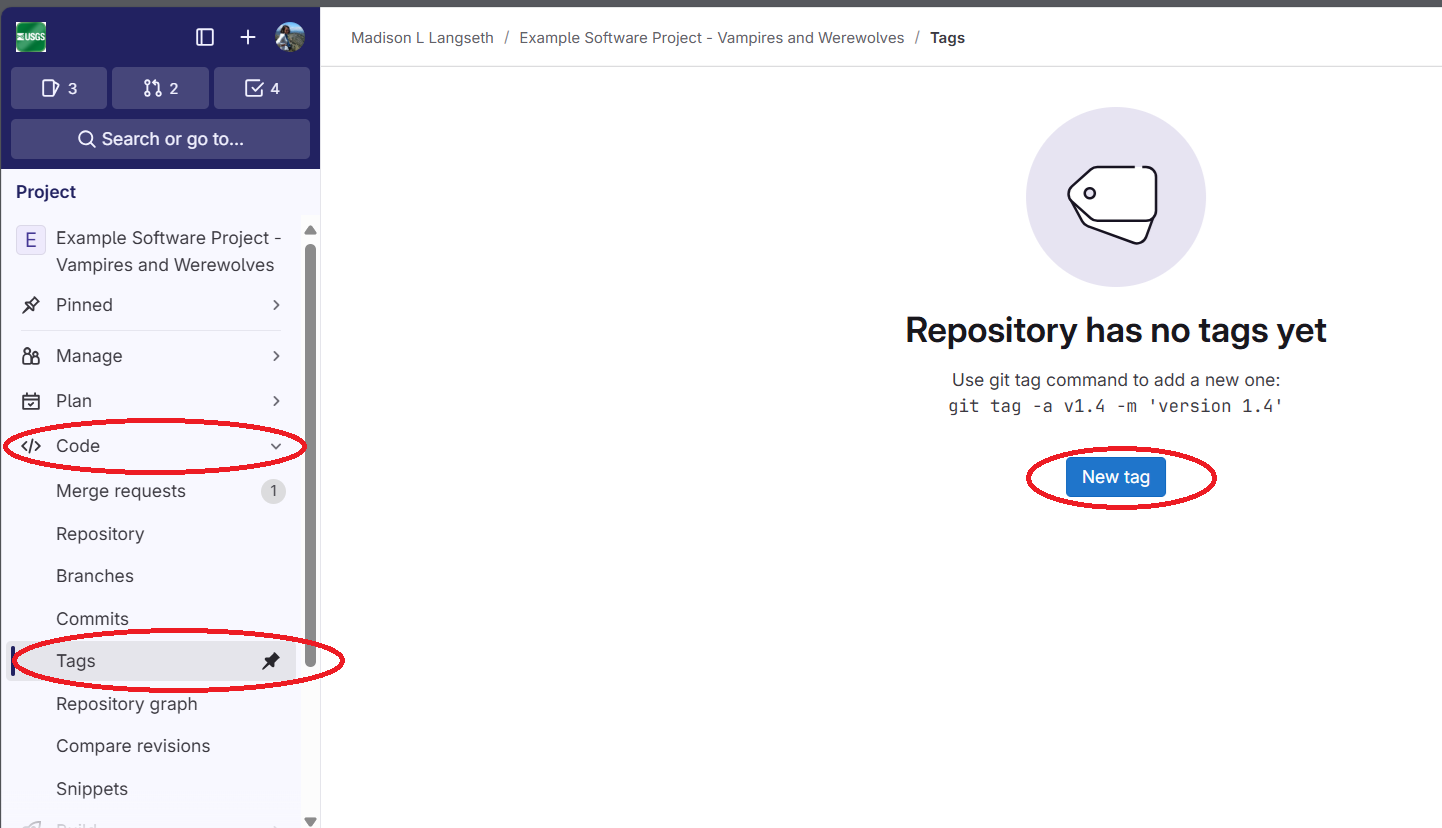
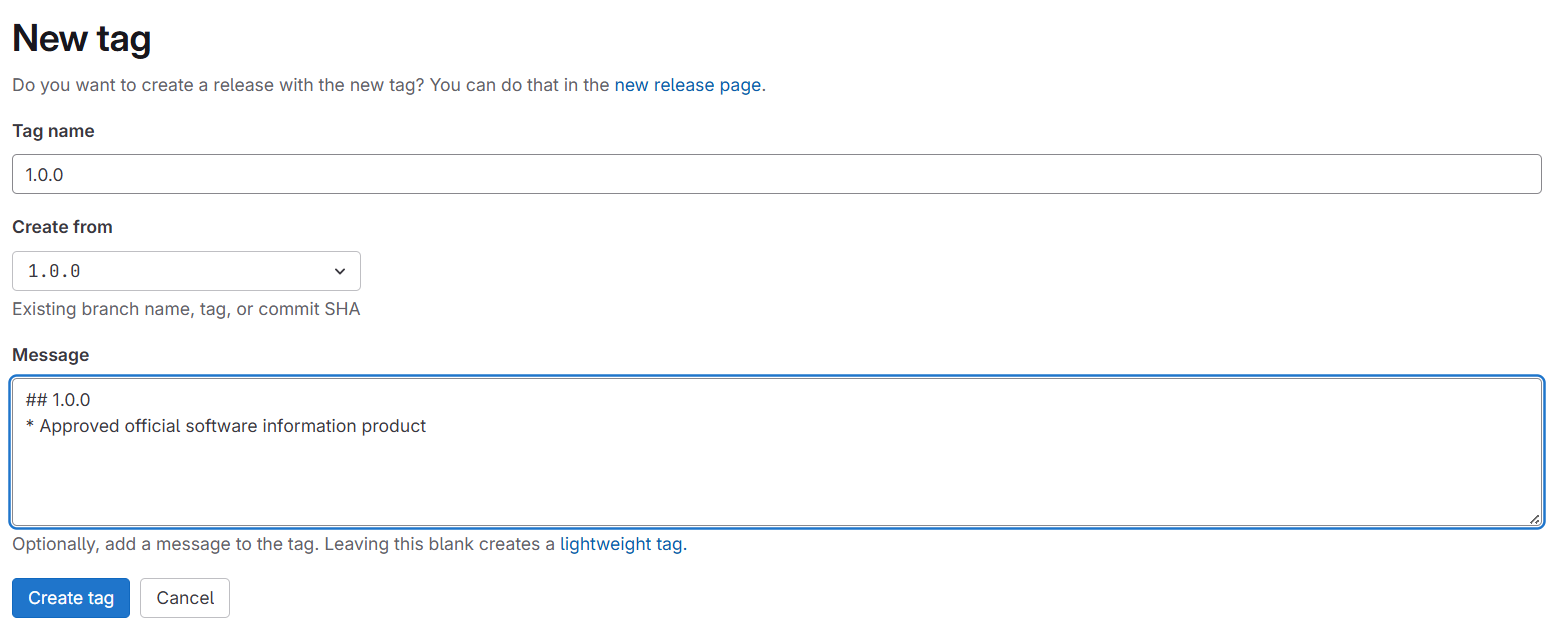
To create a tag, navigate to the left-hand menu and select “Tags” under “Code”, then click “New Tag”:
Then, fill out the tag information with the tag name as the version name, select the release candidate branch (which should have the same name), and write a brief description:
Create a Release from the Tag
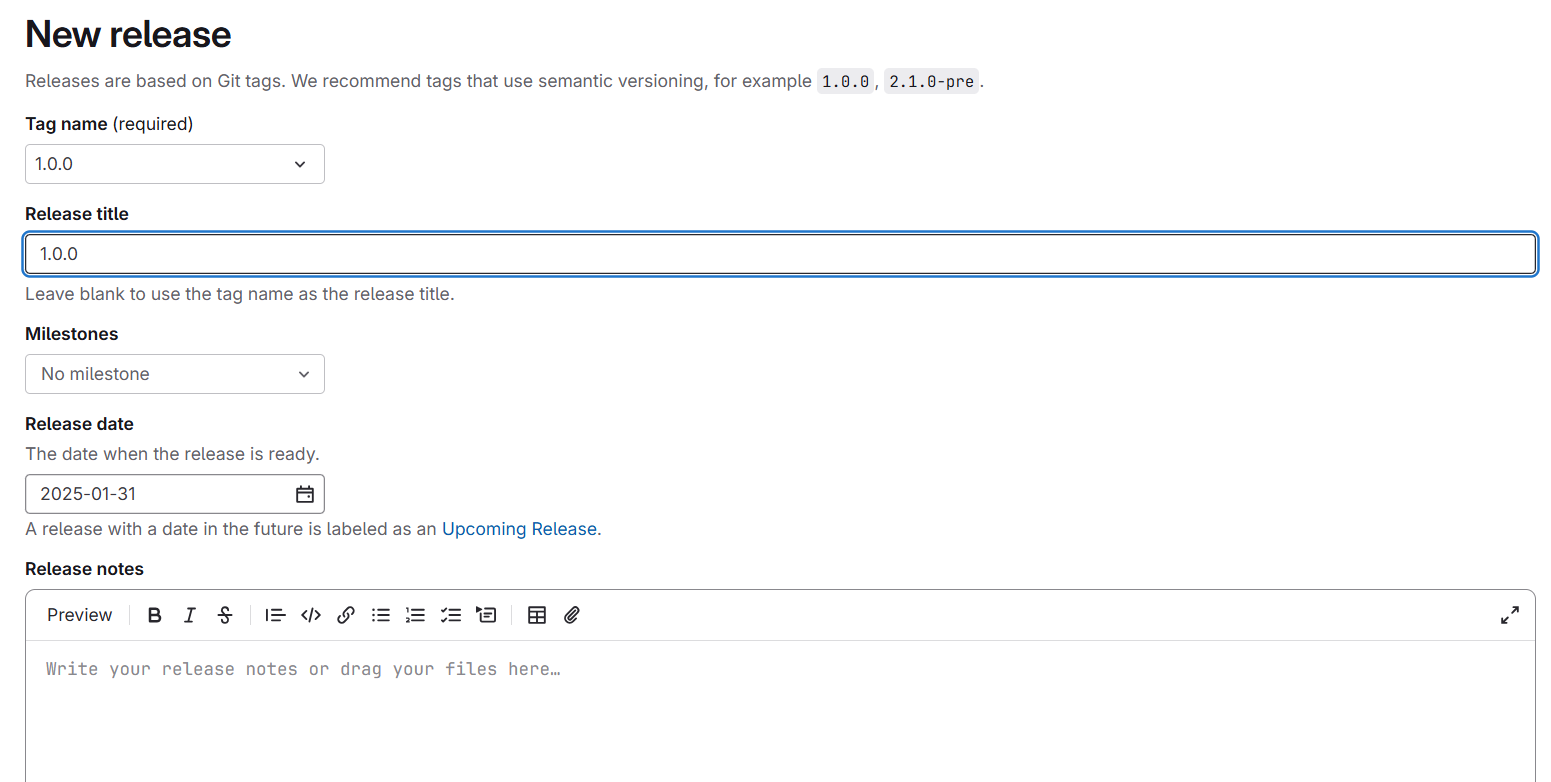
On the next page, create a release from the tag. This release will be used to activate the DOI, i.e., the DOI will point to the release (not the tag, the release candidate branch, or the main branch).

Add a title for the release, which can be the same as the tag and version number. There is a Description box for any notes you may want to add, which you can edit at any point. For example, if you publish an updated version of the repository, you may want to come back, and redirect users to the most up-to-date version.
Once done, click “Create Release”. Then use the url to activate the
DOI. The url should be in this format:
https://code.usgs.gov/GROUP_HIERARCHY/REPOSITORY_NAME/-/releases/RELEASE-NAME
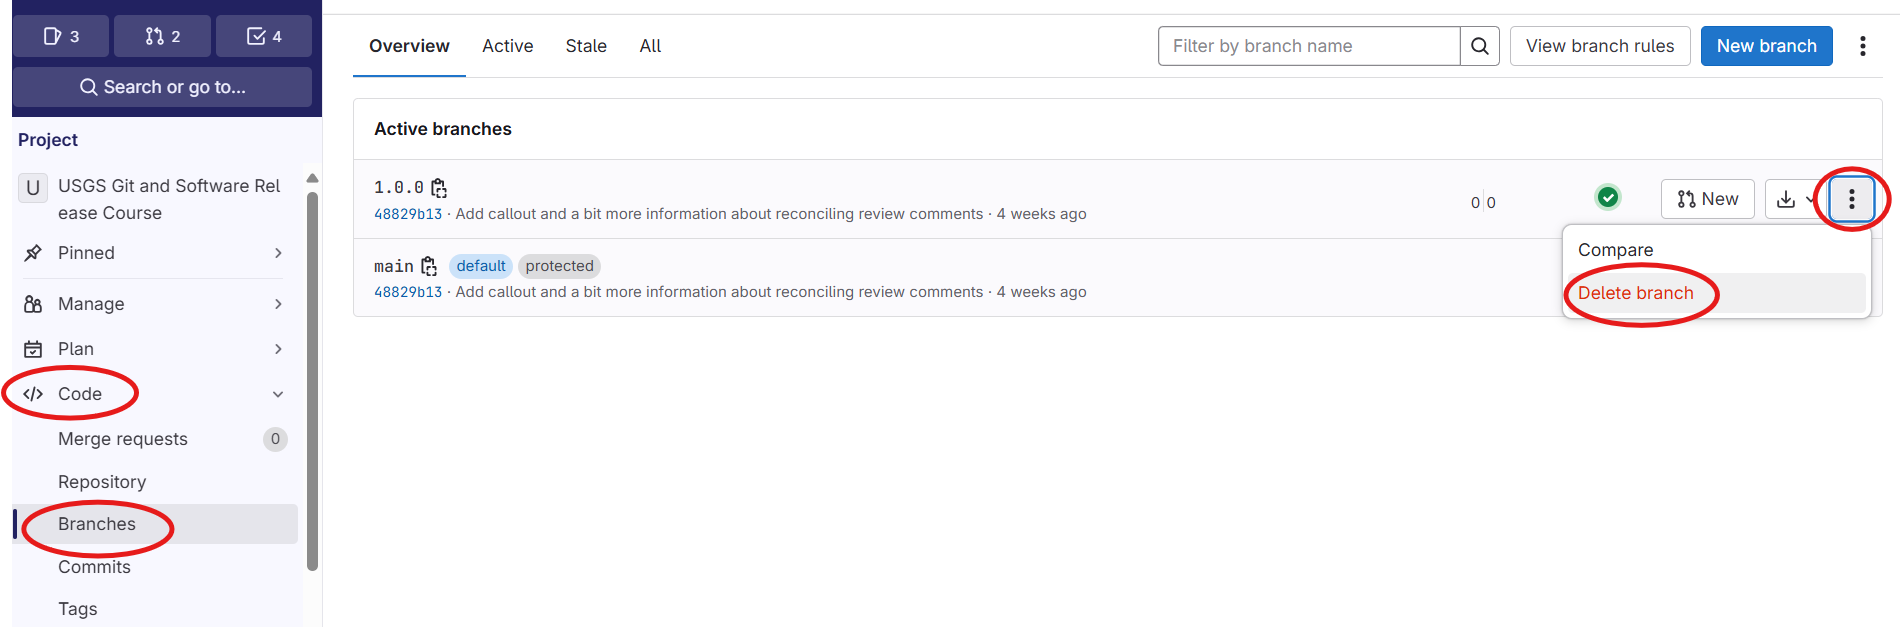
Now that you have the static tag and release, delete the release candidate branch by navigating to “Branches” under “Code” on the left-hand menu, then click the three vertical dots on the release candidate branch, and click “Delete branch”:
Why do we create a Release?
Why is it preferable to point the DOI to a release rather than a tag or branch? You cannot edit a tag or the release branch, but you can add notes or updates to a release. These notes may be useful to the user in the case that there is a more updated version or other information you wish to share.
Create a Git tag and associated release
Follow the above instructions to create a tag and release in your Vampires and Werewolves repository.
Activate your DOI
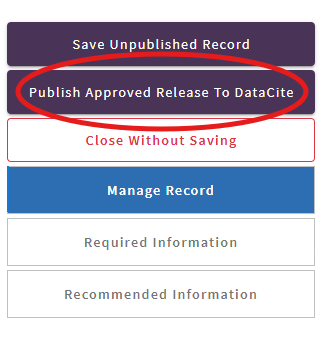
Use the USGS Asset Identifier Service to manage the DOI you created in the citation lesson. Before you can activate the DOI, you will need to include the creators, publication year, URL to the Release page, IPDS number, and related publication (if applicable). If you would like your scientific software information product to be displayed on the USGS website, you will also need to include a brief description of the product in the DOI. Once you have filled in this required information, the “Publish Approved Release to DataCite” button on the left-hand menu will become active and you will be able to click on it:
Note: As part of this course we are not creating and publishing DOIs
Disseminate in IPDS
Your last step, as with any USGS product, is to Disseminate the record in IPDS. Follow your Center’s policy on how to disseminate the product.
- Once you have approval to release the software, update the
DISCLAIMER.md - Submit an new issue as the first step in publishing a software product
- Create an static Git tag and associated release
- Activate your DOI using the url of the Git release