
Continuing Your Project
Last updated on 2026-07-16 | Edit this page
Overview
Questions
- How do I follow policy when developing an open-source project?
- When should I release updated versions of my project?
- How do I prepare my project for subsequent releases?
Objectives
- Continue development on your open-source project.
- Release subsequent versions of your open-source project.
In many cases, work must continue on a project after it becomes publicly accessible. This may be following an official USGS Software Information Product release or following a more informal open-source release process. In any case, USGS supports open-source project development with some conditions.
Continue Open-Source Project Development
When developing an open-source project, all modifications must receive, at minimum, one administrative security review before incorporation into the open-source project. This review must ensure no sensitive or personally identifiable information is exposed by incorporating these changes.
There are workflows supporting this review process. Previously in this course, we introduced a branching workflow, which must be modified in order to align with policy during open-source development. One modified workflow that aligns with policy requirements is called a “Forking Workflow”.
Forking Workflow
With a forking workflow, each developer on the project creates a private personal copy, or fork, of the shared open-source (public) project. This fork is often referred to as the developer’s “origin” and the shared open-source project is often referred to as the “upstream”.
A forking workflow is also beneficial because it removes barriers to new collaborator contributions. Rather than needing to individually grant access to each potential collaborator, anyone can fork the open-source project and submit a merge request to contribute.
What is in a name?
The terms “origin” and “upstream” are conventions within the broader software development community for referencing the remote repository locations. These could be called anything, but following the convention improves shared understanding across development teams.
To view all your remote locations and their aliases using the command line, try
The forking workflow is similar to the branching workflow except the branches are created within the developer’s origin and the merge requests are from the developer’s origin to the shared upstream repositories. Let us see how this works.
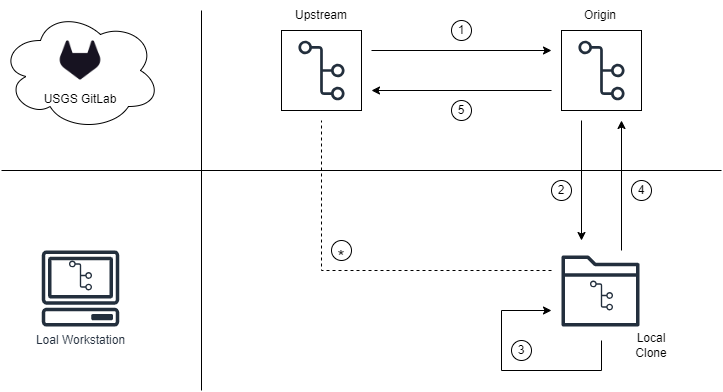
In the diagram above we see an upstream and origin location within the USGS GitLab platform. Within the developer’s local workstation we see a local clone where the developer will work. A high-level overview of the workflow is as follows:
- Developer creates a personal fork called an origin
- Developer configures their fork to their local workstation
- Developer continues project development on branches within the local clone
- Developer pushes completed branches from their local clone to their origin
- Developer submits a merge request from the branch in their origin to the default branch in the upstream. A maintainer reviews and optionally merges the changes.
1. Create a fork
Creating a developer fork is a one-time process for each developer. The developer will fork the upstream repository to create their origin repository. This is completed within the GitLab interface by navigating to the upstream location and clicking the “Fork” button in the upper right area of the page.
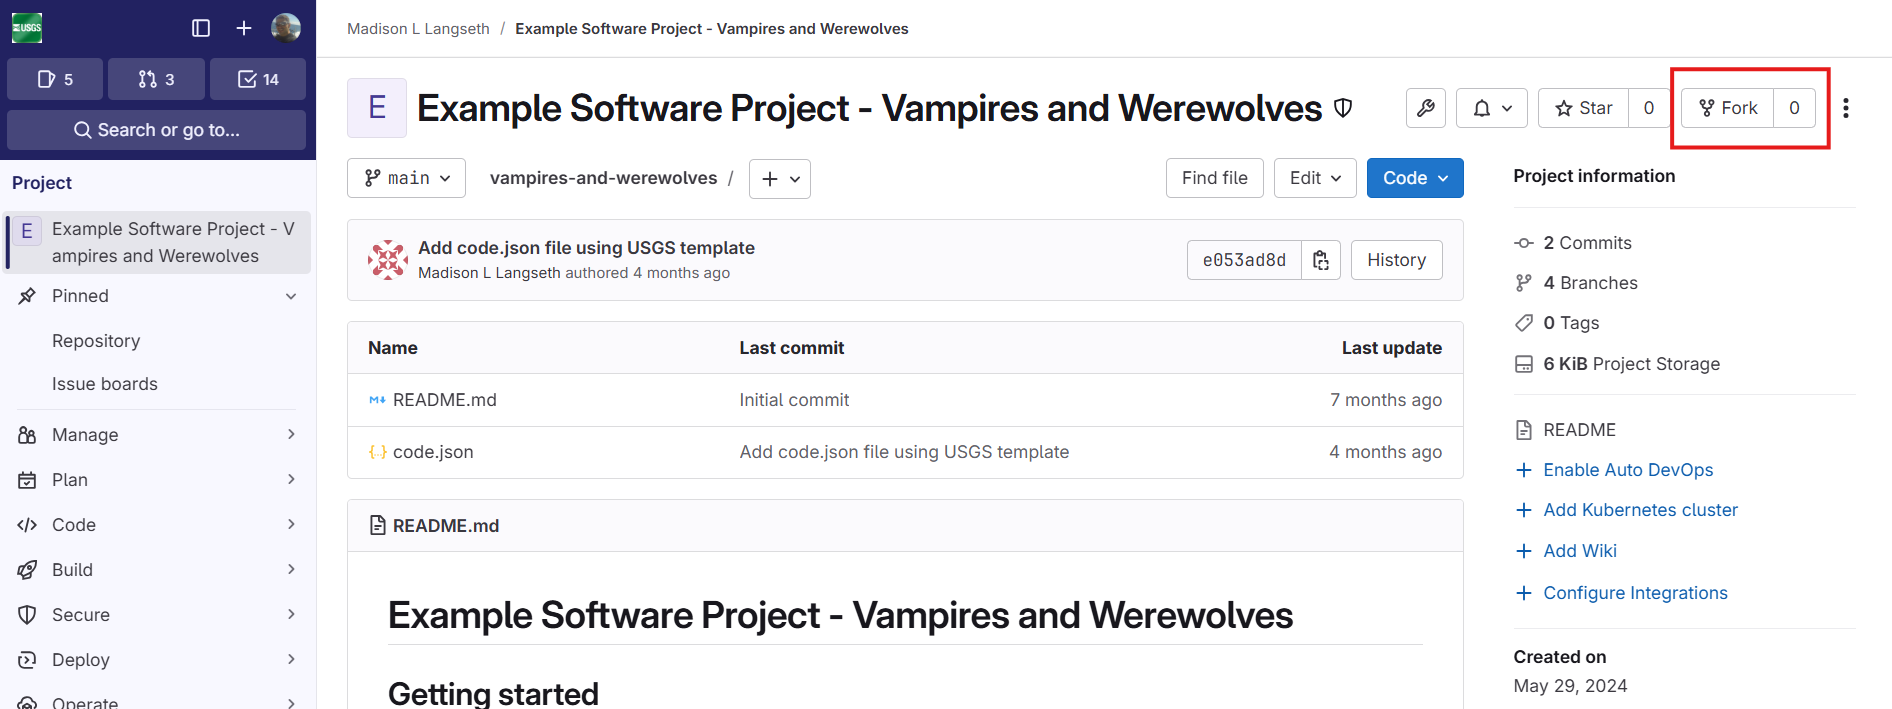
It is important to click the “Fork” text and not the number to the right of the “Fork” text as these have different effects. On the next screen the developer must provide some information about their fork and then click the “Fork project” button near the bottom.
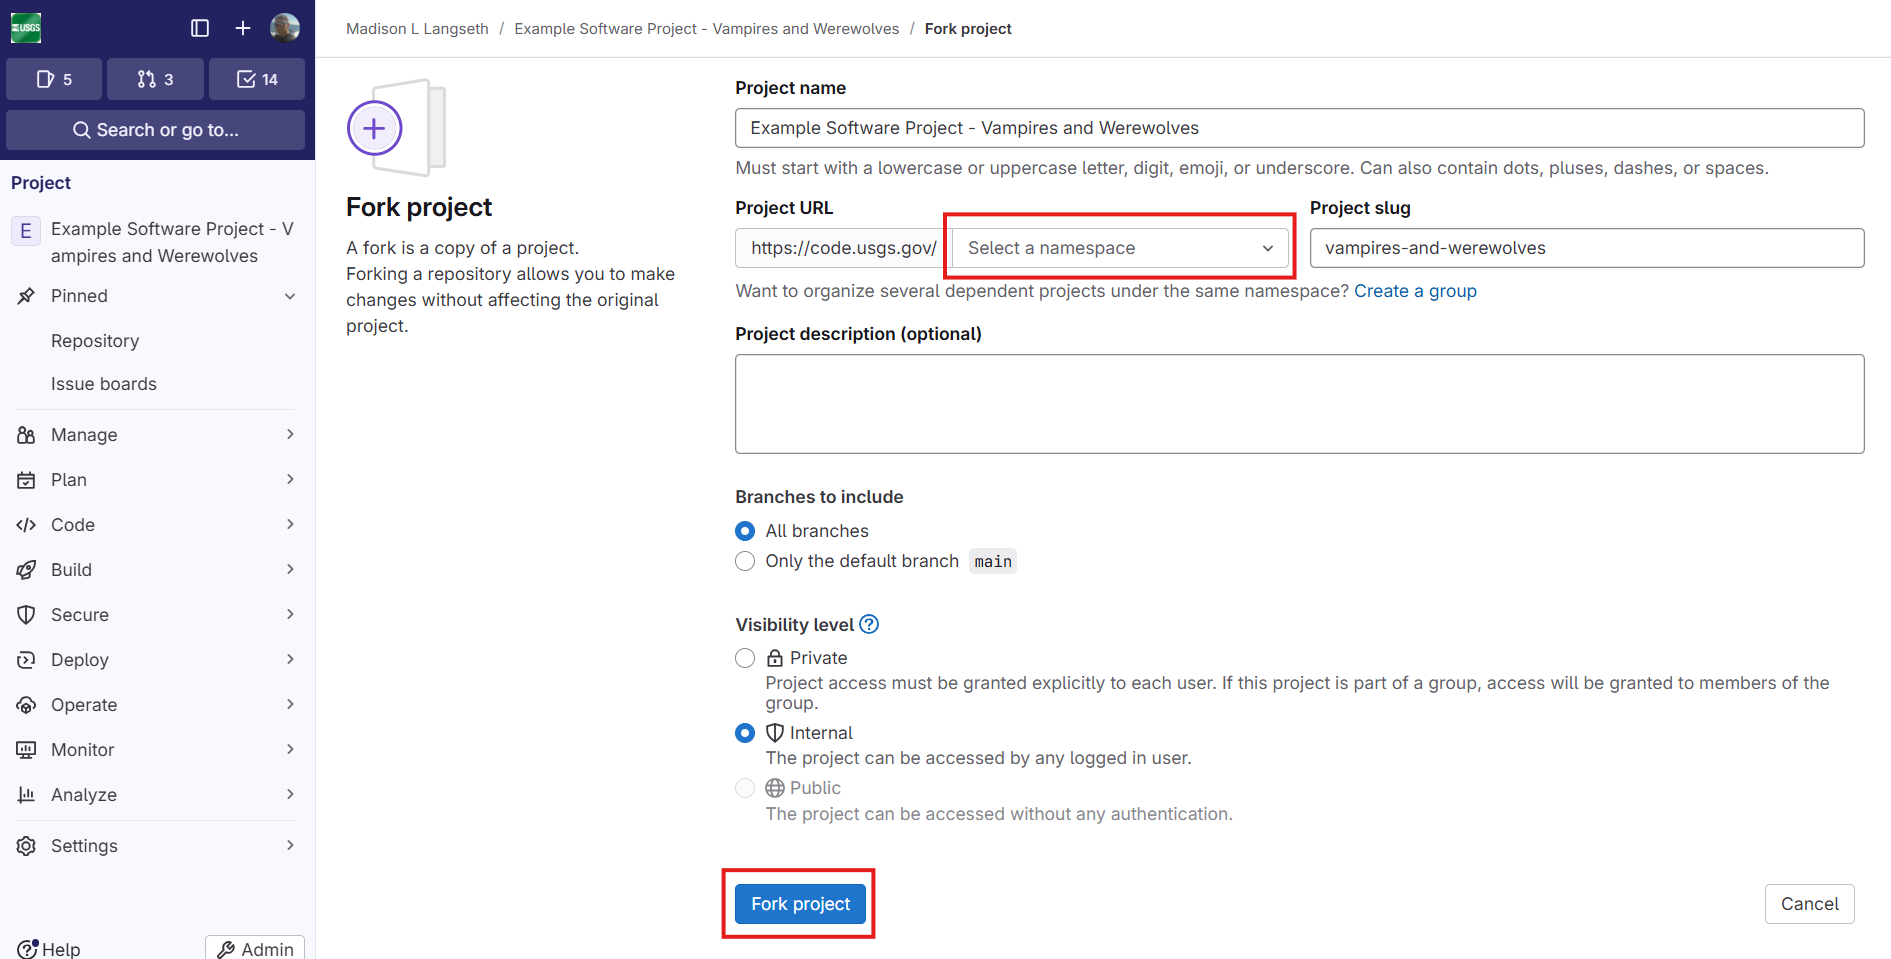
Primarily, the developer must “Select a namespace” where the fork will be created. Typically they would select their personal user namespace. It is uncommon to change the project name, project slug, or project description. Typically all branches should be included in the fork and the visibility can be either “Private” or “Internal”; however, “Public” will be disabled.
Visibility Matters
Personal forks are not allowed to be made publicly accessible. Only the shared upstream project location may be publicly accessible. However, when the fork has a more restrictive visibility than the upstream, GitLab often makes incorrect default assumptions when the developer subsequently creates merge requests. GitLab will assume the merge request is from the developer fork and to the developer fork, which is incorrect. For this reason, it is important to pay attention when creating the merge request later.
2. Configure local clone
The local clone may be configured in one of two different ways. If the developer had previously cloned the repository from what is now called the upstream, we can rename the existing remote to be called “upstream” and then add a new remote called “origin”. Alternatively, if the developer does not yet have a local clone of the project, they can clone their origin and add an “upstream”. The end result is the same.
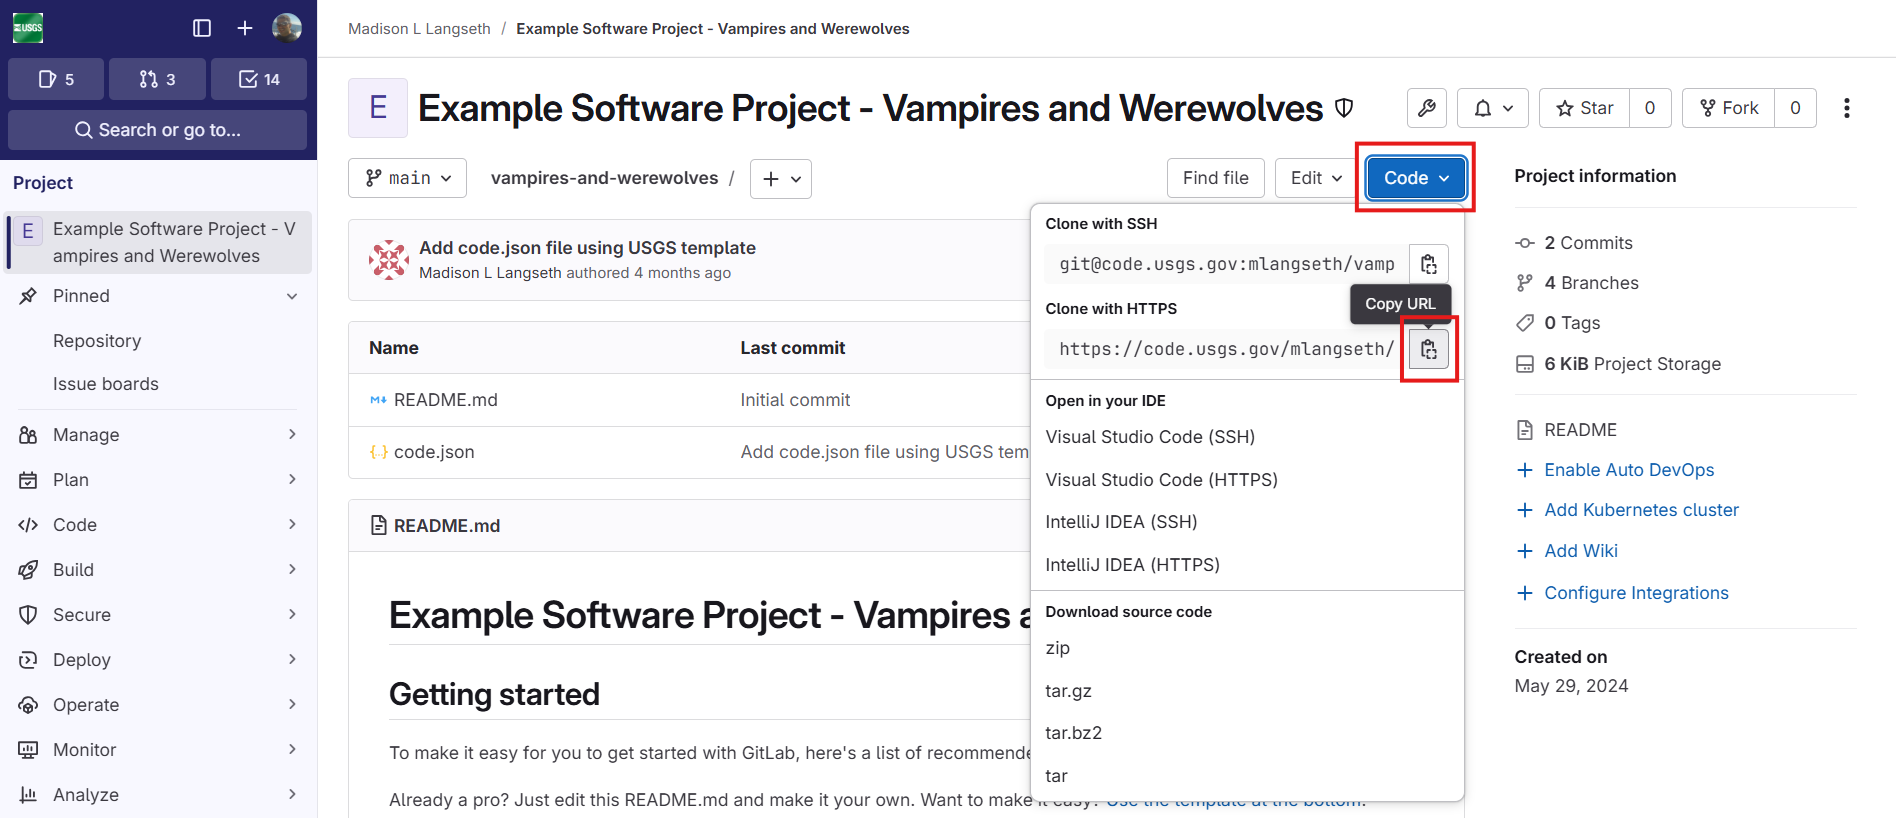
The ORIGIN_URL and UPSTREAM_URL values may
be copied from the GitLab web interface by navigating to the
corresponding project page, selecting the “Code” drop down option and
then clicking the copy icon for the “Clone with HTTPS” option.
3. Continue project development
Within your local clone and personal origin, development continues following the branching workflow as described in the previous “Branching and Merging” episode. The developer creates different branches for each logical group of changes and commits them locally.
4. Push completed branches
When local development work is ready for integration, the developer
pushes their local branch to their developer origin. If the developer
previously pushed with the -u or
--set-upstream-to flags as described in the “Branching and Merging” episode, it is
important to reset these now since the “origin” is pointing to a new
location. More simply, you may always explicitly specify what is pushed
to where using:
In the above command, 1-my-first-issue is the name of
the branch that is pushed and origin is the remote
destination to where that branch is pushed.
5. Integrate changes
The developer should open a merge request from the
development branch in their origin repository to the upstream default
branch (e.g., main). To do this, first navigate a web
browser to the developer origin project page on USGS GitLab. Then,
select “Code” and “Merge requests” from the navigation menu on the left.
Next click the “New merge request” button.

On the next screen, select the correct “Source branch” and “Target branch” information and then click “Compare branches and continue”.
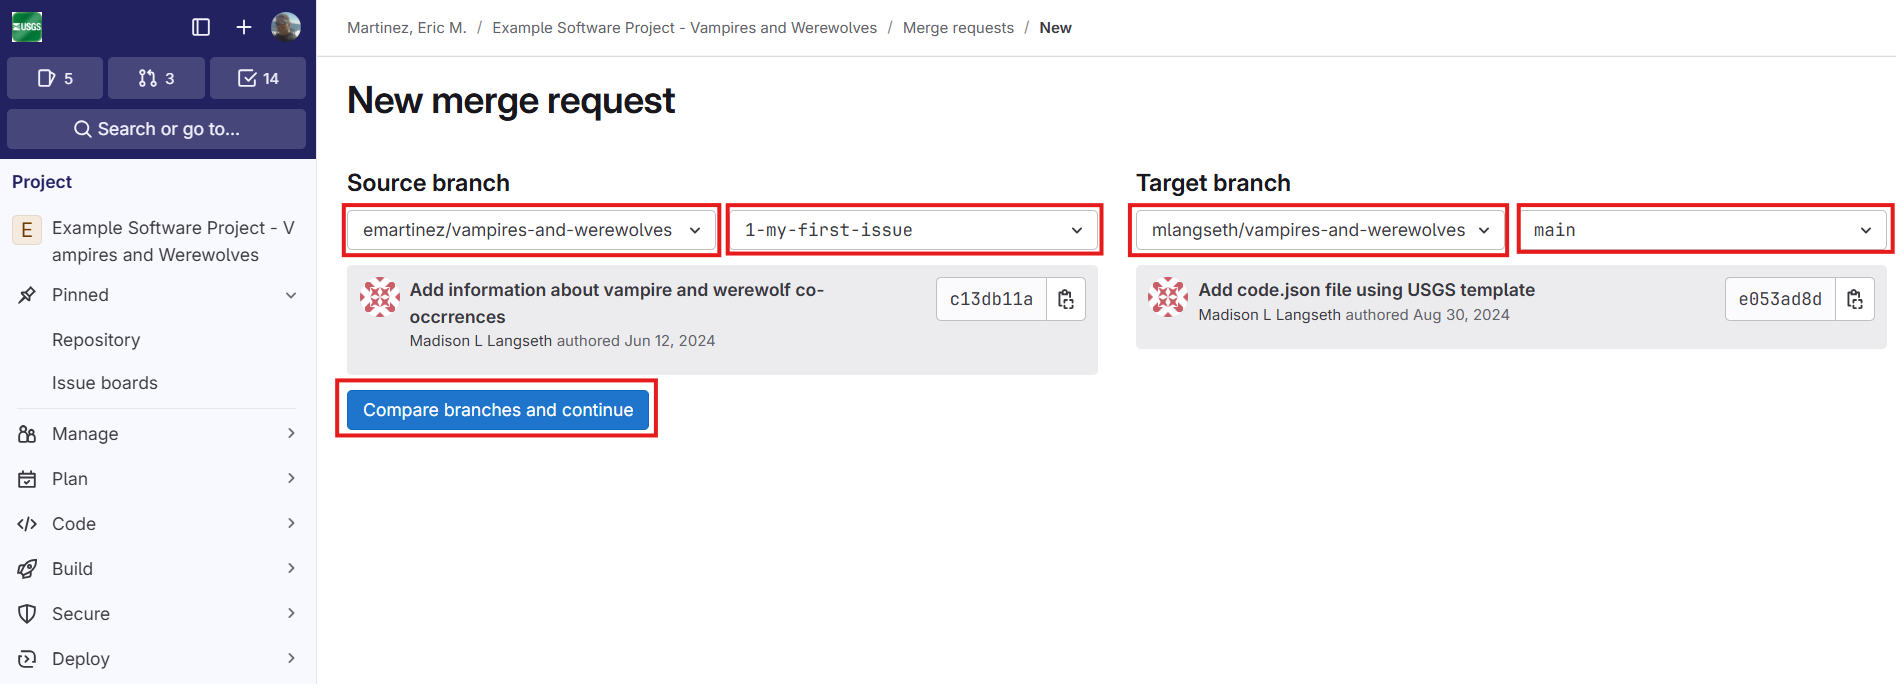
In the “Source branch”, the developer fork location should be selected in the first drop down box. This should be the default if opening a merge request from the developer fork project page. The second drop down box in this section does not default to anything and the desired development branch should be selected.
In the target branch, it is important the correct upstream location is selected. In the screenshot, the “mlangseth” location is selected as the upstream. The default branch in the selected target location will be selected by default, this is typically correct but may be different for specific development teams.
Visibility (still) matters
If the visibility of the origin and upstream match, GitLab will select the correct values for the source and target repository locations. In general, this will not be the case following this open-source continuing development guide. It is for this reason you must carefully select the correct repository locations when on this screen.
On the final screen, you are given the option to provide a custom merge request title, description, labels, assignments, etc. Complete these choices appropriately and click the “Create merge request” button at the bottom to create the final merge request.
This new merge request can now be reviewed, commented on, reconciled, and integrated in the same manner as was described in the previous “Branching and Merging” episode.
Subsequent Releases
Following some amount of development on the open source project, it may become appropriate and/or necessary to release a new version of the software project as a new official USGS software information product. The new version of the project is subject to the same review and approval requirements as if it were the first or only release of the project. A new Information Product Data System (IPDS) record, a new digital object identifier (DOI), and updated metadata (code.json), are all required.
Triggering a subsequent release
When may a subsequent version of the software project be released as a new official USGS software information product?
When must a subsequent version of the software project be released as a new official USGS software information product?
In general, the triggering criteria for a subsequent release of a software project as an official USGS software information product are the same as for the original release of the software project.
A subsequent version of the software development project may be released as a new official USGS software information product at the author’s discretion.
A subsequent version of the software development project must be released as a new official USGS software information product if this new version is desired to be cited and/or results thereof are intended to be used to support some other official USGS information product.
Review & Reconciliation Workflow for your 2nd Software Product
If you are preparing a second official USGS software information product, we recommend the below workflow:
In the public, upstream repository, create a new branch from the tag that contains the first official USGS software information product. This branch will become your new release candidate branch. In this example, we call it
2.0.0Start a merge request from
maininto2.0.0. It will contain every commit that occurred since the first release, and therefore every change and commit that needs to be reviewed. Ask your reviewer(s) to conduct their reviews using this merge request.After the peer reviewer(s) have submitted their comments, create a new branch from
mainon your personal fork and address each comment (i.e., conduct the reconciliation). This is also a good time to update thecode.jsonwith an entry for the new2.0.0branch (see instructions below). Merge this branch intomainback on the upstream repository. These changes will then appear in your first merge request, demonstrating how you reconciled the peer review.Merge the first merge request from
maininto2.0.0. From here, you can update theDISCLAIMER.mdwith the approved language and follow the standard workflow, as described in the Publishing episode.
Note that whether you are publishing your 2nd product or your 1st product but using an open-source workflow, the release candidate branch is created in the upstream repository and not on your personal fork.
Preparing Metadata
For releasing subsequent software information products, use a forking
workflow to modify the code.json file and merge the changes into the
main branch upstream. Update the status field for the
previous version to Archival, if applicable. Multiple versions may be in
Production at once.
Copy the text from the previously released object in the code.json
and paste it between the main branch object and the previously released
object (still within the array []). Add a comma after the
closing bracket (}) for the object to separate it from the
previous product.
Update the version, status,
permissions.license.URL, downloadURL,
disclaimerURL, and laborHours in this object
to document the newest version. Additionally, update the
metadataLastUpdated for any metadata objects that have been
modified, including the metadata object for this newest version.
Remember from the Creating Metadata episode that the top-level element in a code.json file is an array. If a project has been under development for a long time, there may be multiple released versions. In this case, objects should be ordered with the DEFAULT_BRANCH (e.g., main) appearing first, followed by the most recently released version, and so-on in reverse chronological order. For example:
JSON
[
  {
    // ... main (DEFAULT_BRANCH), status Development
  },
  {
    // ... release 3.0.0, status Production
  },
  {
    // ... release 2.0.0, status Archival
  },
  {
    // ... release 1.0.0, status Archival
  }
]
In the hypothetical example code.json file above, the release tag for
version 1.0.0 would only include metadata for that product (in addition
to the DEFAULT_BRANCH metadata) and it would likely have a status of
Production. Once you release version 2.0.0, three objects would exist in
the array, first would be the DEFAULT_BRANCH metadata with a status of
Development, next 2.0.0 with status Production and third would appear
1.0.0 with status Archival. However, because we never go back and edit
released tags, you would not change the code.json file in the 1.0.0
tagged version, and it would still specify that version as Production.
However, in the main branch, the code.json file must be
updated to include new software information products. The code.json file
may include metadata objects marking other milestone tagged versions in
addition to those associated with official USGS software information
products.
Update the code.json File for Subsequent Release
Update the code.json file within the main branch to prepare to release version 2.0.0. What fields did you need to update? How many objects are now in your JSON array? Did you need to change anything in the version 1.0.0 object? What about the main object?
Note that in the real world, you would not make a change directly to the main branch, but instead using a forking workflow. However, for the sake of simplicity within this course, and because our example Vampire and Werewolves repo is not public, we are making these changes directly to the main branch.
JSON
[
  {
    "name": "vampires-and-werewolves",
    "organization": "U.S. Geological Survey",
    "description": "Code for modeling the co-occurrence of Vampires and Werewolves on Mars",
    "version": "main",
    "status": "Development",

    "permissions": {
      "usageType": "openSource",
      "licenses": [
        {
          "name": "Public Domain, CC0-1.0",
          "URL": "https://code.usgs.gov/vdracula/vampires-and-werewolves/-/raw/main/LICENSE.md"
        }
      ]
    },

    "homepageURL": "https://code.usgs.gov/vdracula/vampires-and-werewolves",
    "downloadURL": "https://code.usgs.gov/vdracula/vampires-and-werewolves/-/archive/main/vampires-and-werewolves-main.zip",
    "disclaimerURL": "https://code.usgs.gov/vdracula/vampires-and-werewolves/-/raw/main/DISCLAIMER.md",
    "repositoryURL": "https://code.usgs.gov/vdracula/vampires-and-werewolves.git",
    "vcs": "git",

    "laborHours": 0,

    "tags": [
      "usg-artificial-intelligence",
      "vampires",
      "werewolves",
      "mars"
    ],

    "languages": [
      "Python"
    ],

    "contact": {
      "name": "Vlad Dracula",
      "email": "vdracula@usgs.gov"
    },

    "date": {
      "metadataLastUpdated": "2024-06-15"
    }
  },
  {
    "name": "vampires-and-werewolves",
    "organization": "U.S. Geological Survey",
    "description": "Code for modeling the co-occurrence of Vampires and Werewolves on Mars",
    "version": "2.0.0",
    "status": "Production",

    "permissions": {
      "usageType": "openSource",
      "licenses": [
        {
          "name": "Public Domain, CC0-1.0",
          "URL": "https://code.usgs.gov/vdracula/vampires-and-werewolves/-/raw/2.0.0/LICENSE.md"
        }
      ]
    },

    "homepageURL": "https://code.usgs.gov/vdracula/vampires-and-werewolves",
    "downloadURL": "https://code.usgs.gov/vdracula/vampires-and-werewolves/-/archive/2.0.0/vampires-and-werewolves-main.zip",
    "disclaimerURL": "https://code.usgs.gov/vdracula/vampires-and-werewolves/-/raw/2.0.0/DISCLAIMER.md",
    "repositoryURL": "https://code.usgs.gov/vdracula/vampires-and-werewolves.git",
    "vcs": "git",

    "laborHours": 300,

    "tags": [
      "usg-artificial-intelligence",
      "vampires",
      "werewolves",
      "mars"
    ],

    "languages": [
      "Python"
    ],

    "contact": {
      "name": "Vlad Dracula",
      "email": "vdracula@usgs.gov"
    },

    "date": {
      "metadataLastUpdated": "2024-07-01"
    }
  },
  {
    "name": "vampires-and-werewolves",
    "organization": "U.S. Geological Survey",
    "description": "Code for modeling the co-occurrence of Vampires and Werewolves on Mars",
    "version": "1.0.0",
    "status": "Archival",

    "permissions": {
      "usageType": "openSource",
      "licenses": [
        {
          "name": "Public Domain, CC0-1.0",
          "URL": "https://code.usgs.gov/vdracula/vampires-and-werewolves/-/raw/1.0.0/LICENSE.md"
        }
      ]
    },

    "homepageURL": "https://code.usgs.gov/vdracula/vampires-and-werewolves",
    "downloadURL": "https://code.usgs.gov/vdracula/vampires-and-werewolves/-/archive/1.0.0/vampires-and-werewolves-main.zip",
    "disclaimerURL": "https://code.usgs.gov/vdracula/vampires-and-werewolves/-/raw/1.0.0/DISCLAIMER.md",
    "repositoryURL": "https://code.usgs.gov/vdracula/vampires-and-werewolves.git",
    "vcs": "git",

    "laborHours": 200,

    "tags": [
      "usg-artificial-intelligence",
      "vampires",
      "werewolves",
      "mars"
    ],

    "languages": [
      "Python"
    ],

    "contact": {
      "name": "Vlad Dracula",
      "email": "vdracula@usgs.gov"
    },

    "date": {
      "metadataLastUpdated": "2024-07-01"
    }
  }
]
The 2.0.0 object was added between the main
and 1.0.0 release objects. The following fields were
updated for the 2.0.0 object: version,
status, permissions.license.URL,
downloadURL, disclaimerURL,
metadataLastUpdated, and laborHours. There are
now 3 objects in the code.json array. The status and the
metadataLastUpdated fields were updated in the
1.0.0 object. Nothing was updated in the main
object.
- A good workflow can streamline open-source project development while ensuring compliance with governing policies
- While specific criteria necessitate releasing subsequent versions, this may also be done at the author’s discretion
- Subsequent versions are released in a manner very similar to the initial version
- The code.json file should be updated to include another object within the array that describes the new version.