
Collaborating
Last updated on 2026-07-16 | Edit this page
Overview
Questions
- How can I use version control to collaborate with other people?
Objectives
- Clone a remote repository.
- Collaborate by pushing to a common repository.
- Describe the basic collaborative workflow.
For the next step, get into pairs. Each person will play the role of “Owner” and “Collaborator”. The goal is for the Collaborator to add changes into the Owner’s repository. We will switch back and forth between the roles throughout this episode.
Practicing By Yourself
If you are working through this lesson on your own, you can carry on by opening a second terminal window. This window will represent your partner, working on another computer. You will not need to give anyone access on GitLab, because both ‘partners’ are you.
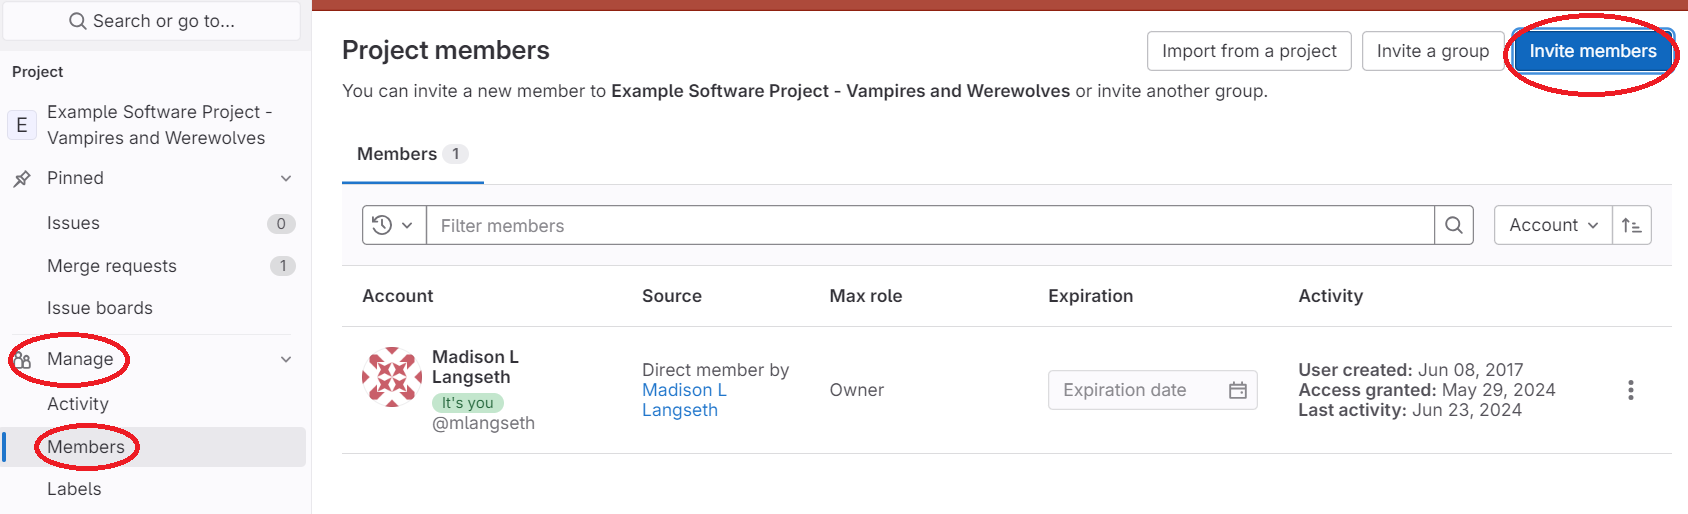
Update Repository Permissions
The Owner needs to give the Collaborator access. In your repository
page on GitLab, click the Manage menu on the left, select
Members, click Invite members. Enter your
partner’s username or email address in the search box, select a role
(either Developer or Maintainer), and click
Invite.
Clone the Repository
Once the Collaborator has access to the repository, they need to download a copy of the Owner’s repository to their machine. This is called “cloning a repo”.
The Collaborator does not want to overwrite their own version of
vampires-and-werewolves.git, and so needs to clone the
Owner’s repository to a different location than their own repository
with the same name. (This is a weird case…you would not normally have
two versions of the same Git repo on your local machine.)
To clone the Owner’s repo into their Desktop folder, the
Collaborator can copy the repository URL from the repository homepage by
clicking Code and Clone with HTTPS.

HTTPS allows you to communicate with GitLab using the HTTPS protocol. This approach tends to be a little simpler and allows you to use a Personal Access Token (similar to a password) to authenticate. You can use the same Personal Access Token across multiple machines.
SSH is considered slightly more secure and requires setting up a public and a private key. There is a little more overhead to using SSH over HTTPS, especially if working on more than one machine, which is why we teach the HTTPS method in this Lesson. SSH also requires being on the internal USGS network (including GlobalProtect) and will not work for external collaborators. That being said, it is not too hard to configure your account to use SSH and the instructions are available at https://docs.gitlab.com/ee/user/ssh.html.
Then, open bash and navigate to your Desktop. Remember your Desktop may be under your OneDrive (e.g., ~/OneDrive - DOI/Desktop).
Next, enter the following (replacing
https://code.usgs.gov/vdracula/vampires-and-werewolves.git
with the URL that was just copied and replacing vdracula
with the Owner’s username):
Create a New Branch and Make Changes
The Collaborator can now make a change in their clone of the Owner’s repository, exactly the same way as we have been doing before:
Once in the text editor, add something to the pluto.txt
file, below is an example:
OUTPUT
It is so a planet!Then save, exit nano, and check your work:
OUTPUT
It is so a planet!The Importance of Branches
Using branches in Git becomes even more important when you begin
collaborating with others. Branches can help you avoid conflicts and
allow others to review your code before merging it with the main branch
where it could potentially introduce bugs and conflicts with the work of
others on your team. You can also ‘protect’ the default (e.g.,
main) branch to prevent developers from pushing changes
directly to it. If the default branch is protected, the developers
must push to a separate branch and then create a merge request
to add their changes to the default branch. This workflow ensures that
changes to the default branch get reviewed and approved. Learn more
about GitLab protected branches in the GitLab Documentation.
Stage, Commit, and Push Changes
OUTPUT
 1 file changed, 1 insertion(+)
 create mode 100644 pluto.txt
Then push the change to the Owner’s repository on GitLab:
OUTPUT
Enumerating objects: 4, done.
Counting objects: 4, done.
Delta compression using up to 4 threads.
Compressing objects: 100% (2/2), done.
Writing objects: 100% (3/3), 306 bytes, done.
Total 3 (delta 0), reused 0 (delta 0)
To https://code.usgs.gov/vdracula/vampires-and-werewolves.git
   9272da5..29aba7c  main -> main
Note that we did not have to create a remote called
origin: Git uses this name by default when we clone a
repository. (This is why origin was a sensible choice
earlier when we were setting up remotes by hand.)
Take a look at the Owner’s repository on GitLab again, and you should be able to see the new branch and commit made by the Collaborator. You may need to refresh your browser to see the new commit.
Create and Comment on a Merge Request
Collaborator: Create a merge request that will merge
pluto-branch with main. Set the Owner as the
Reviewer.
Owner: Add a comment to the line that was added in
pluto.txt. Then, approve and merge the merge request.
Collaborator: Review Branching and Merging Episode “Creating Merge Requests” for a reminder of how to create a merge request in GitLab.
Owner: With GitLab, it is possible to comment on the diff of a merge
request. Go to the Changes tab within the merge request.
Hover over the line of code to comment and a blue comment icon appears.
Click to open a comment window.
Pull Merged Changes to Local Repositories
Once the new code has been merged to the main branch,
both the Collaborator and Owner should pull the changes to their local
repositories.
To download the changes from GitLab, enter:
Now the three repositories (Owner’s local, Collaborator’s local, and Owner’s on GitLab) are back in sync.
A Basic Collaborative Workflow
In practice, it is good to be sure that you have an updated version
of the repository you are collaborating on, so you should
git pull before making our changes. The basic collaborative
workflow would be:
- update your local repo with
git pull origin main, - create a feature branch
git switch -c <branch-name>, - make your changes and stage them with
git add, - commit your changes with
git commit -m "YOUR COMMIT MESSAGE HERE", - upload the changes to GitLab with
git push -u origin <branch-name>, - create a merge request in GitLab, and
- merge once the feature branch has been reviewed and approved.
- update your local
mainbranch withgit switch mainandgit pull origin main
It is better to make many commits with smaller changes rather than one commit with massive changes: small commits are easier to read and review.
Review Changes
The Owner pushed commits to the repository’s main branch without giving any information to the Collaborator. How can the Collaborator find out what has changed with command line? And on GitLab?
On the command line, the Collaborator can use
git fetch origin main to get the remote changes into the
local repository, but without merging them. Then by running
git diff main origin/main the Collaborator will see the
changes output in the terminal.
On GitLab, the Collaborator can go to the repository and click on “Code” -> “Commits” to view the most recent commits pushed to the repository.
-
git clonecopies a remote repository to create a local repository with a remote calledoriginautomatically set up. - Branches are an important part of collaborating with others in Git repositories.
- Ensure that you establish a collaborative workflow for your project team to use.