
Branching and Merging
Last updated on 2026-04-27 | Edit this page
Estimated time: 30 minutes
Overview
Questions
- What are branches in Git and why should I use them?
- How do I merge a branch back into my
mainbranch?
Objectives
- Explain why you would want to use a branching workflow, even when you are the only person working on your project.
- Create a branch within a Git repository.
- Create a merge request and merge a branch into a
mainbranch.
Git Branches
A Git branch is a version of the repository where you can make and
review changes before updating the clean, trusted content of the
repository. A branch is a safe place to test things out without
impacting your main branch. You are free to make mistakes
and have the flexibility to fix them within a branch.
Create a branch
- Open Git Bash (Windows) or Terminal (MacOS) and navigate to your
local repository. Once you are in your project, the current branch will
be specified (usually
main). - Let us create a new branch:
- Execute
git switch -c my-test-branch - The
-cflag is what tells Git to create a new branch - This will create a new branch with the name you specified that is
otherwise an identical copy of the branch you just created it from (in
this case,
main) and switch you over to the new branch
- Execute
- To switch between branches, execute:
git switch <branch-name>- We can switch back to the
mainbranch withgit switch main - Switching branches will automatically load all of the files on that branch into your computer’s project file directory
- We can switch back to the
git switch and git restore were introduced
in 2019 to separate out the functionality of git checkout,
which confused many people by doing too many things.
git switch <branch-name> can be used
interchangeably with git checkout <branch-name>, but
the command-line options can be slightly different. If you are switching
to an existing branch, then the two would look the same:
However, if you want to create a new branch, they differ:
Create a branch on your own
- Create a new branch on your own called
1-my-first-issue - Switch back to
main - Switch back to
1-my-first-issue
git switch -c 1-my-first-issuegit switch maingit switch 1-my-first-issue
GitLab issues are common ways of tracking the work that needs to be
done on a project. A common branch naming convention is to use the issue
number and a short description of what you are doing as the branch name
(e.g, <issue number>-<what-you-are-doing>),
similar to what you did in this exercise. Another common naming
convention is to use lower-spear-case for your branch
names.
Make updates to code
This is when you do your work. Create your scripts, organize files/folders, etc. Do all your work in the repository with the correct branch checked out.
Important Note
Repositories should not contain any sensitive information, including personally identifiable information, usernames, passwords, or full file paths. While file paths may not be as obviously sensitive as other examples, they are frequently included in scripts. It is worth mentioning that full file paths also decrease portability of scripts to other users!
Let us edit the mars.txt file, again.
Type the text below into the mars.txt file after the
last line:
OUTPUT
Two vampires and three werewolves were spotted on Mars.Add the file to the staging area:
Commit the changes:
Push the changes to remote:
The -u flag is shorthand for
--set-upstream-to, which sets the default remote branch for
the current local branch. Prior to this push, the remote repository was
not aware of the local branch, and the local branch did not have any
connection to the remote. Moving forward, this sets the remote-local
association for any future git push or
git pull attempts.
Checkout a diagram-based tutorial on branching
Having trouble visualizing how the branches relate to each other? Navigate to the Learn Git Branching website, select the tutorial on “Branching in Git” from the “Introduction Sequence”, and follow the prompts.
Notice that this website has tutorials for other Git workflows. You may want to revisit this website for more practice after you finish this course.
Git Merge Requests
Merge requests allow for peer code review before merging new code
into a branch (usually the main branch).
Creating Merge Requests
There are many ways to create a merge request in GitLab. See GitLab’s Creating merge requests to see them all.
When you push a new branch into GitLab, GitLab will add a banner
message about the push and provide a convenient
Create merge request button.
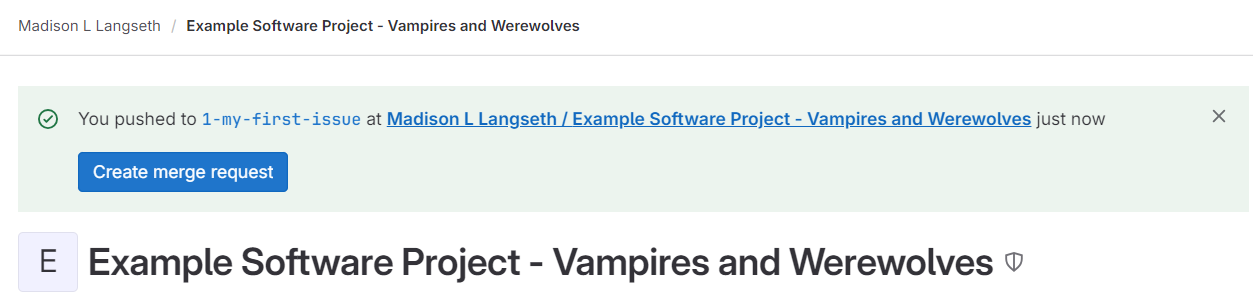
If you use this method to create the merge request, you will not need to specify the source and target branches.
Add a succinct title and description. The description can follow this basic format:
- Describe why this merge request exists
- Explain what was changed
- Explain how the change addresses the issue
- Provide information on how the reviewer can test your code
Select an Assignee (This is the person who owns the merge request but is not responsible for reviewing it) and a Reviewer.
Click Create merge request.
If you have time, you can go into detail about other merge options like deleting the source branch or squashing commits.
Merging Merge Requests
Once a merge request has been created, you can see an overview, the commits that were made, and all of the line-by-line changes that were made to the content.
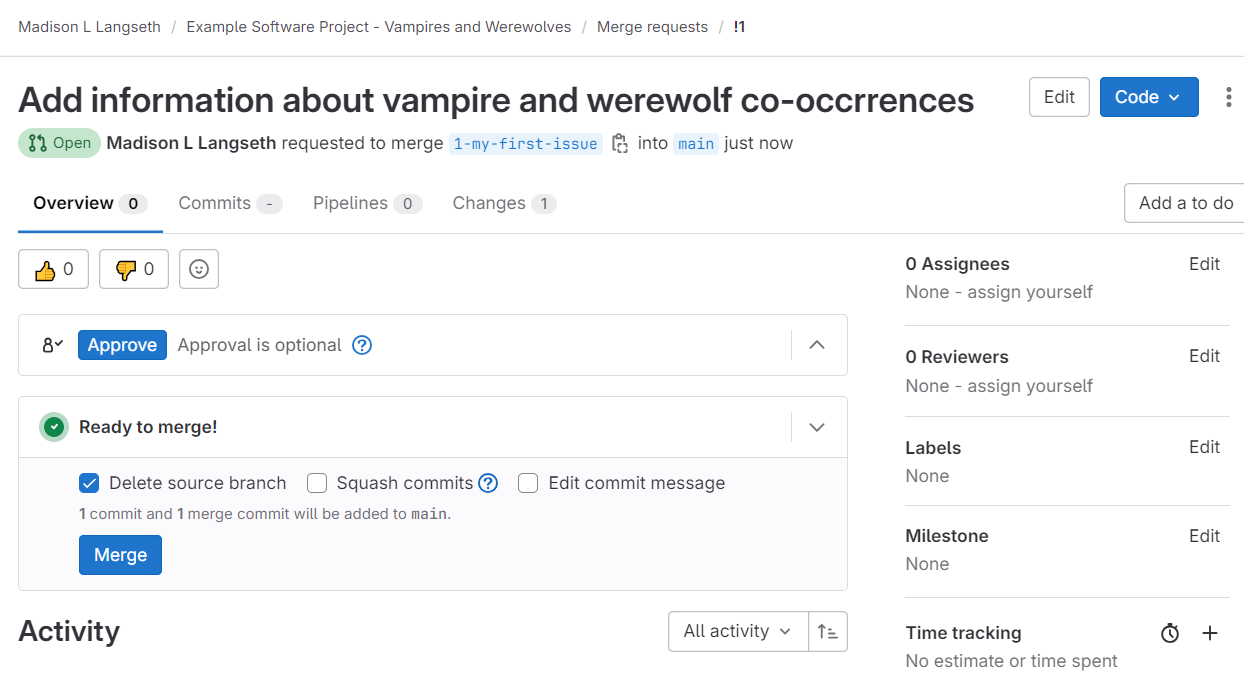
After all of the changes have been reviewed, the
Reviewer can click Approve and the
Assignee can click the Merge button to merge
the updates into the main branch.
Challenge
- Review your merge request. Can you see the changes that were made? How might you add a comment to a specific line of code?
-
Mergeyour changes intomain. Are you able to see the updated file in yourmainbranch?
Click on the “Changes” tab within the Merge Request page. Hover over a line number and click the “dialog box” pop-up to add a comment.
Back on the “Overview” tab of the Merge Request, click “Merge” to merge your changes into
main.
Deleting a Branch
After merging the new branch into the main branch, the new branch
will be automatically deleted from the remote repository (if
Delete source branch is checked during the merge request).
But that branch still exists in your local repository. If you want to
clean up the clutter of an extra branch, hop back to your local terminal
(Git Bash) to delete it:
- Check all existing branches to see what you want to delete
- Switch to
mainbranch since Git will not delete a branch you are on - Delete the branch that has already been merged into
main